
Disclosure: This article may contain affiliate links. If you purchase through these links, Workspacio HQ may earn a commission at no additional cost to you.
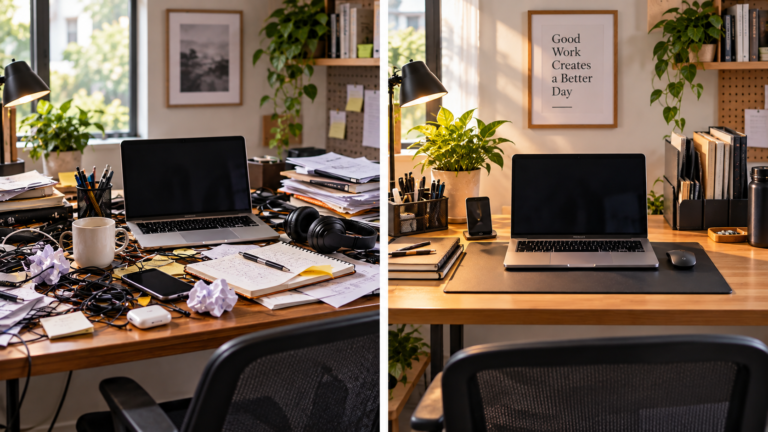
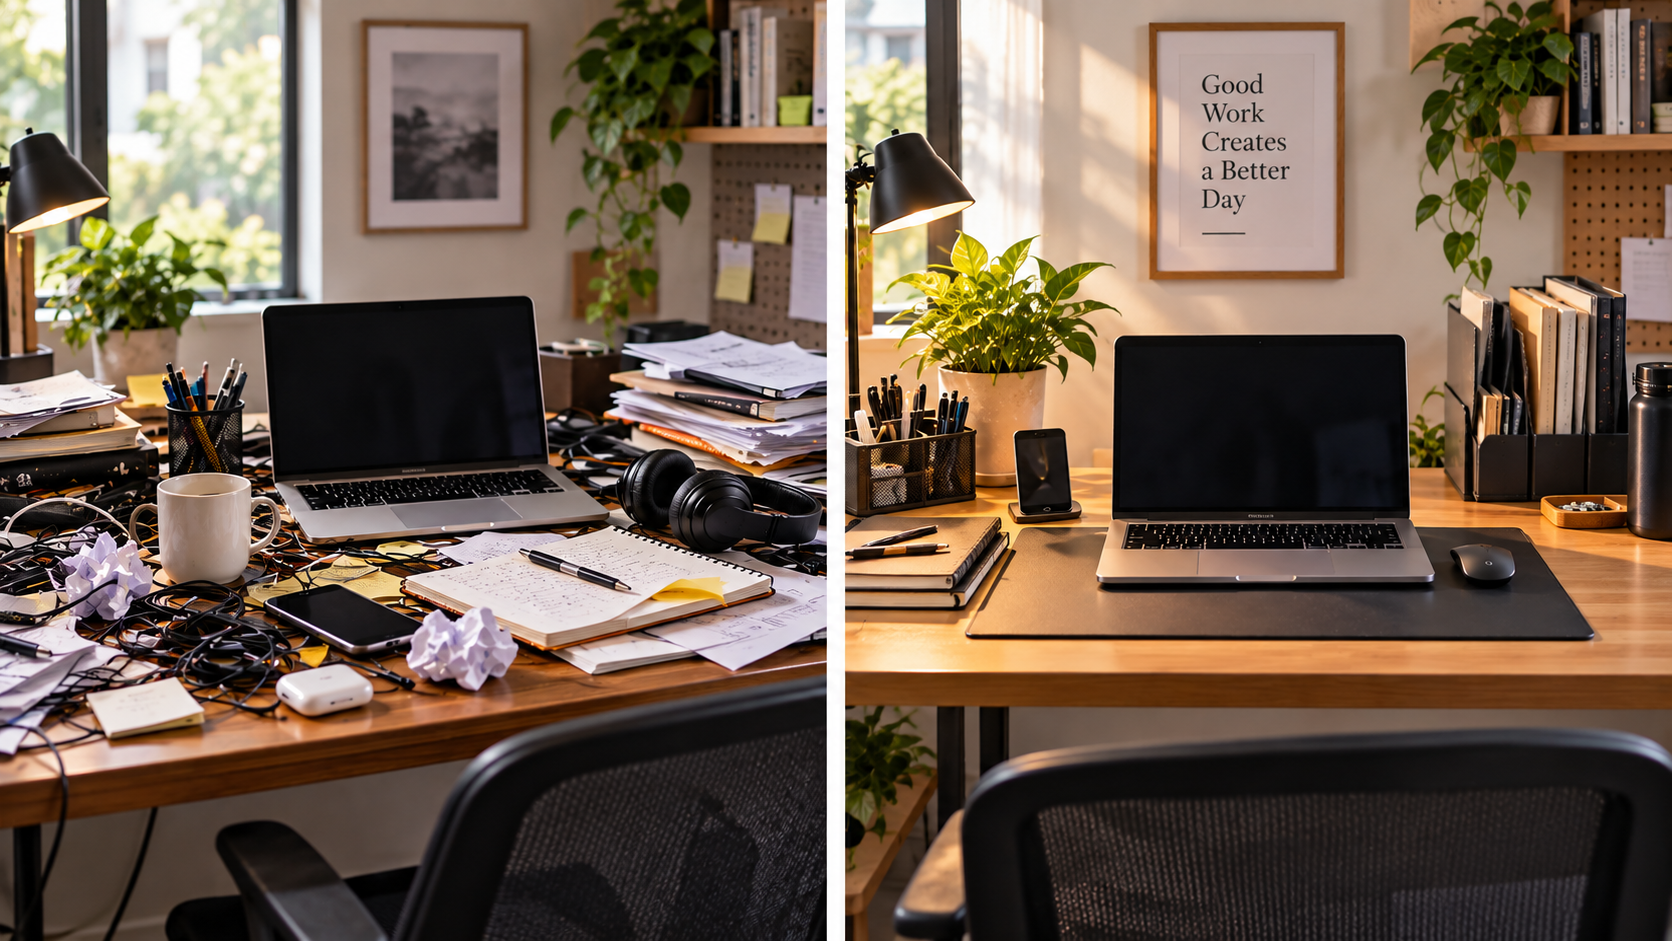
Learning how to organize a cluttered home office desk isn’t just about clearing everything off the surface. A desk can go from organized to cluttered surprisingly fast. A notebook stays open after a meeting, charging cables spread across the surface, a few papers become a pile, and small items such as pens, adapters, and earbuds never seem to have a permanent place.
Clearing everything off can make the desk look better temporarily. But if you put the same things back in roughly the same places, the clutter usually has an easy path back.
A more useful approach is to organize your desk around how you actually work—not around how you want it to look in a photo.
That means deciding what deserves easy access, what can live farther away, where loose items belong, and whether an organizer would solve a real problem or simply add another object to the desk.
Quick Answer Box
Start by identifying what you actually use during a normal workday. Keep frequently used items accessible, move occasional items away from your primary work area, give papers and small accessories one defined home, position your devices before managing their cables, and avoid adding organizers unless they solve a specific storage problem.
The goal isn’t a perfectly empty desk. It’s a desk that’s functional, easy to understand, and realistic to maintain.
1. Start With How You Actually Use Your Desk
Before you buy an organizer or decide where anything should go, look at what happens during a normal workday.
What do you repeatedly reach for?
Depending on your work, that might include your keyboard, mouse, notebook, phone, headphones, a pen, or a particular reference document.
Now look at everything else.
You may find spare charging cables, old notes, extra stationery, finished paperwork, packaging, rarely used accessories, or other items occupying the same valuable space as the tools you use every day.
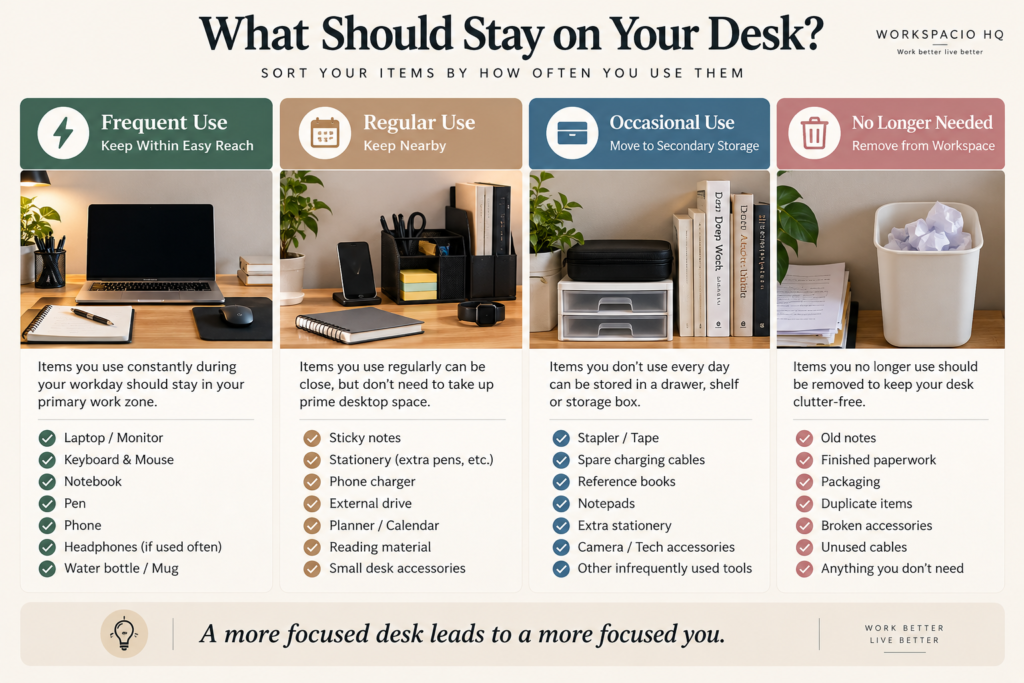
Instead of organizing by appearance, sort your items by their role in your actual workflow:
- Frequent use: Needs convenient access.
- Regular use: Should be nearby, but doesn’t necessarily need to sit on the desktop.
- Occasional use: Can move to secondary storage.
- No longer needed: Remove it from the workspace.
This isn’t an official ergonomic classification; it’s simply a practical way to decide what deserves your limited desk space.
OSHA similarly recommends keeping frequently accessed items within easy reach and allowing occasionally used items to sit farther away.
Workspacio Tip
Don’t start with:
“How can I fit everything on my desk?”
Start with:
“What actually needs to live here?”
That question makes almost every organization decision that follows easier.
2. Remove What Doesn’t Need to Live on Your Desk
Now make the first physical change: remove the things that don’t need permanent desktop space.
Start with obvious clutter such as old receipts, packaging, empty cups, finished notes, duplicate stationery, outdated documents, and accessories you no longer use.
Then look at legitimate work items that simply don’t need to stay within arm’s reach.
You may use a stapler once a week. You might need a reference book occasionally. You probably want to keep a backup charging cable—but none of those things automatically need a permanent position beside your keyboard.
Move them somewhere appropriate based on how often you use them: a drawer, shelf, cabinet, storage box, or another nearby location.
Don’t turn this into an exercise in extreme minimalism, though.
A plant, framed photo, or favorite desk object doesn’t need to pass a productivity test to stay. If you enjoy having it there and it doesn’t interfere with your workspace, it can stay.
The goal is intentional space, not an empty surface.
If the larger problem is that your whole workspace is short on room, our guide to
3. Give Your Remaining Items a Priority
After removing unnecessary clutter, resist the temptation to put everything else back where it was.
Instead, decide which items deserve the easiest access.
Think of your desk as having a primary zone and a secondary zone.
Your primary zone is for tools you interact with constantly: typically your keyboard, mouse, and whatever else your specific work requires.
Your secondary zone can hold things you use regularly but don’t need every few minutes—a notebook, headphones, phone, or a small set of supplies, for example.
Occasional tools can move farther away.
The practical rule is simple:
The more often you use something, the easier it should be to reach.
This is more useful than deciding placement based only on what looks symmetrical or attractive.
4. Protect Your Primary Work Zone
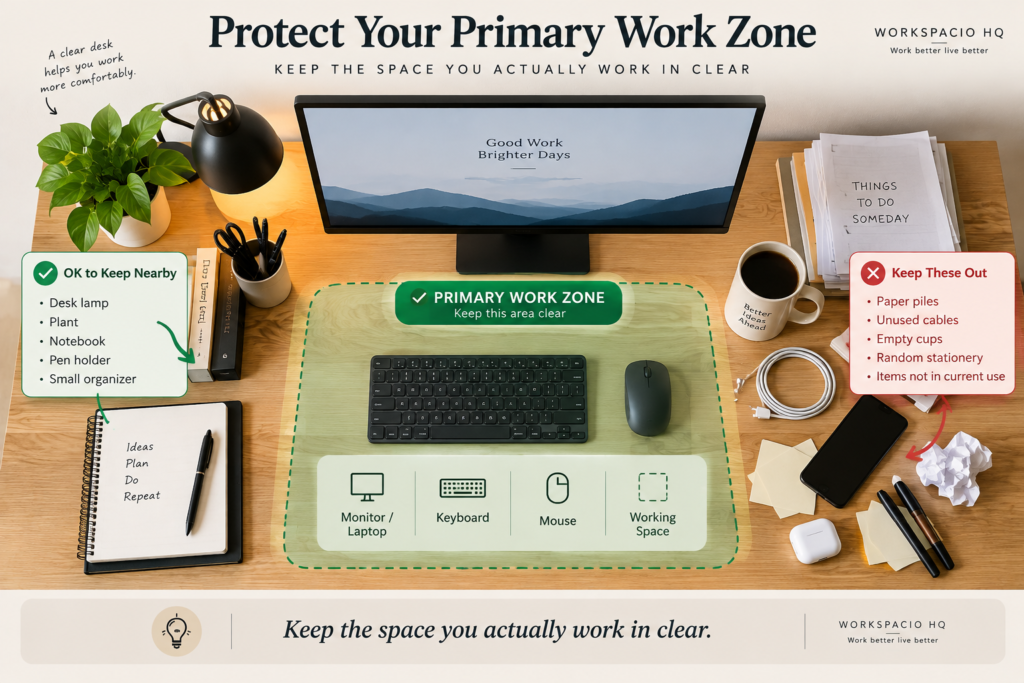
Once you’ve decided what deserves priority, protect the space where your actual work happens.
For many home office setups, that means the area occupied by the monitor or laptop, keyboard, mouse, and the working space immediately around them.
This area shouldn’t gradually become overflow storage for mail, paperwork, chargers, coffee mugs, stationery, or newly purchased organizers.
Your desk can still have a notebook, lamp, plant, organizer, and other useful objects while remaining functional.
What matters is whether you can use your main equipment comfortably without first moving unrelated things out of the way.
5. Give Small Items a Permanent Home
Pens, sticky notes, USB drives, adapters, earbuds, memory cards, and other tiny objects can make a desk look chaotic even though none of them takes up much space individually.
Their real problem is often simpler:
They don’t have a permanent home.
Before buying anything, see whether your existing storage can solve that.
You might keep pens in one cup, adapters in a drawer, earbuds in a small container, and sticky notes in one designated location.
The exact system doesn’t matter as much as consistency. When you’re finished using an item, there should be an obvious place to return it.
When a Desktop Organizer Makes Sense
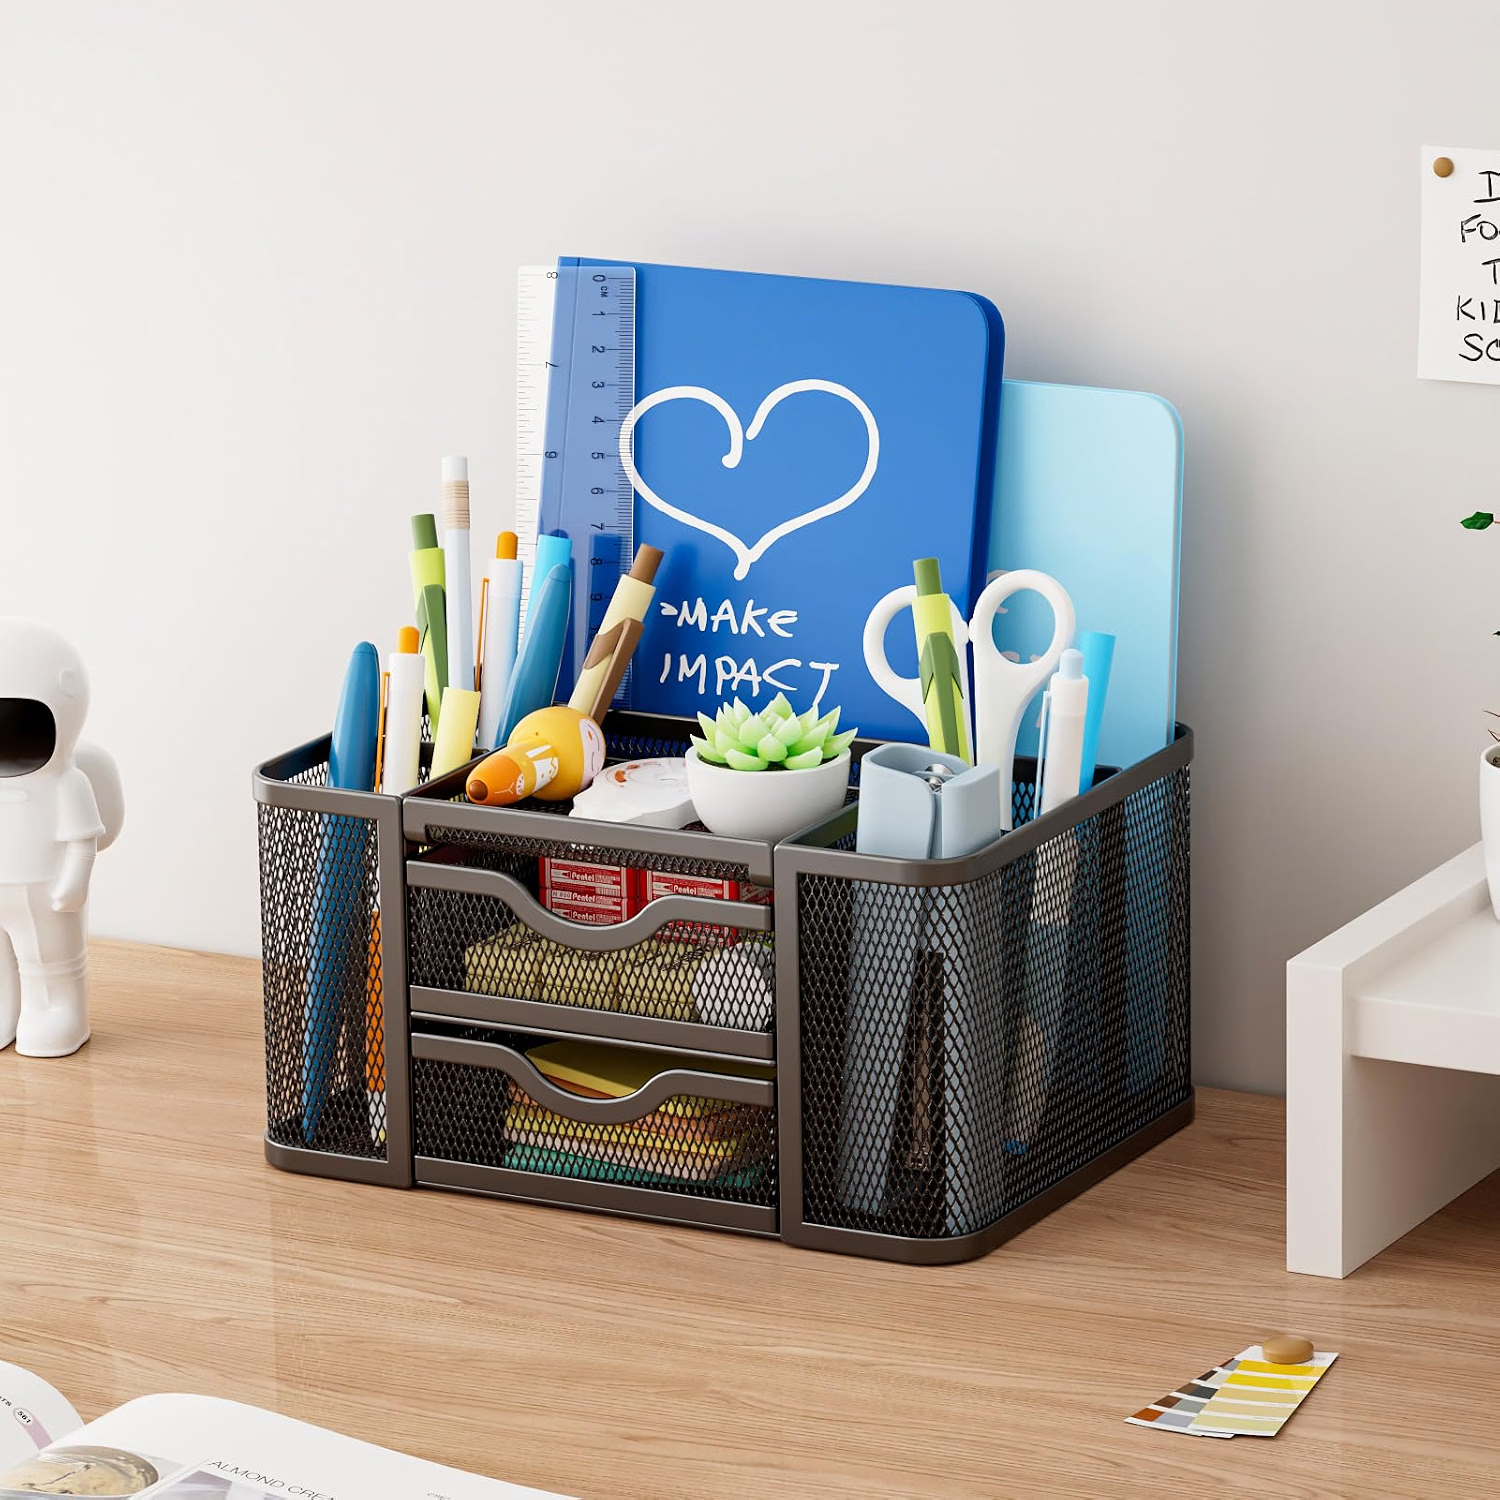
If your desk doesn’t have built-in drawers or your small essentials still lack practical storage, a compact organizer can be useful.
One option is the Marbrasse Mesh Desk Organizer with Drawers, which combines divided storage for stationery and small accessories with additional compartments.
But this is where it’s easy to over-organize.
If all you need to store is two pens and a pack of sticky notes, a multi-compartment organizer may take up more desk space than the clutter it replaces.
6. Create One Place for Active Papers
Paper clutter often grows because documents with completely different purposes end up in the same pile.
Today’s notes land on top of a bill. A document you’re actively editing goes underneath an old printout. A notebook gets added to the stack, and eventually you need to search through everything to find one sheet.
Instead, separate papers by status.
A simple system is:
- Active: Documents you’re currently working with.
- Reference: Material worth keeping but not needed on the desk right now.
- Finished: Material ready to be filed, recycled, shredded, or otherwise handled appropriately.
Only the active category needs prime access.
If you usually handle just a few sheets, an existing folder or tray may be all you need.
If several current projects or folders regularly compete for desk space, a vertical or stepped file sorter can make those papers easier to separate without creating several horizontal piles.
When a File Sorter Makes Sense
If multiple active documents or folders regularly pile up on your desk, a divided file sorter can give each one a defined place while keeping current work visible and accessible.
The Simple Houseware Desk 5-Section Step File Sorter is one option for this setup. Its five divided sections can help separate active folders or documents instead of stacking everything into one pile.
But if you only handle a few papers at a time, an existing folder or tray may already be enough.
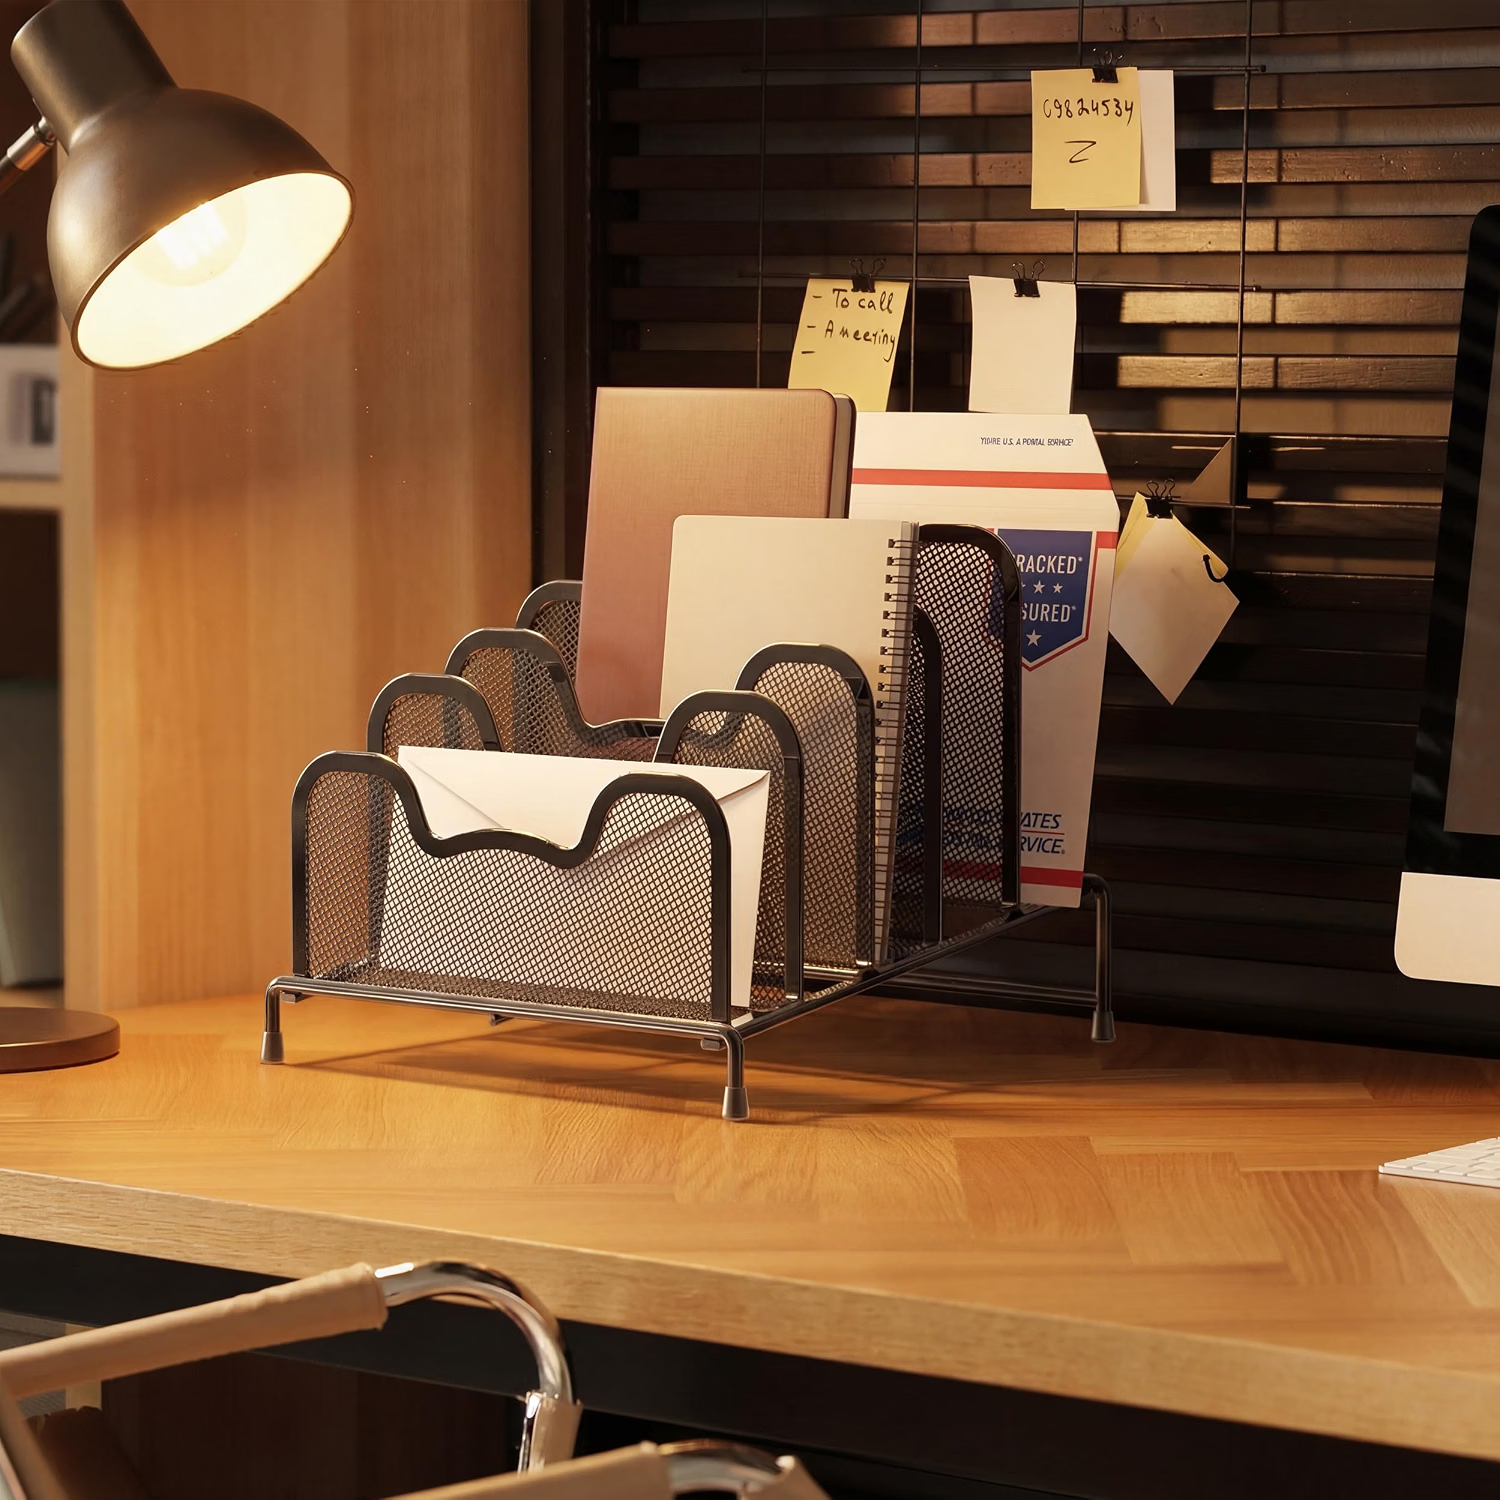
The organizer isn’t the system. When a project stops being active, its papers should leave the active-paper area. Otherwise, even a good file sorter eventually becomes another place where clutter accumulates.
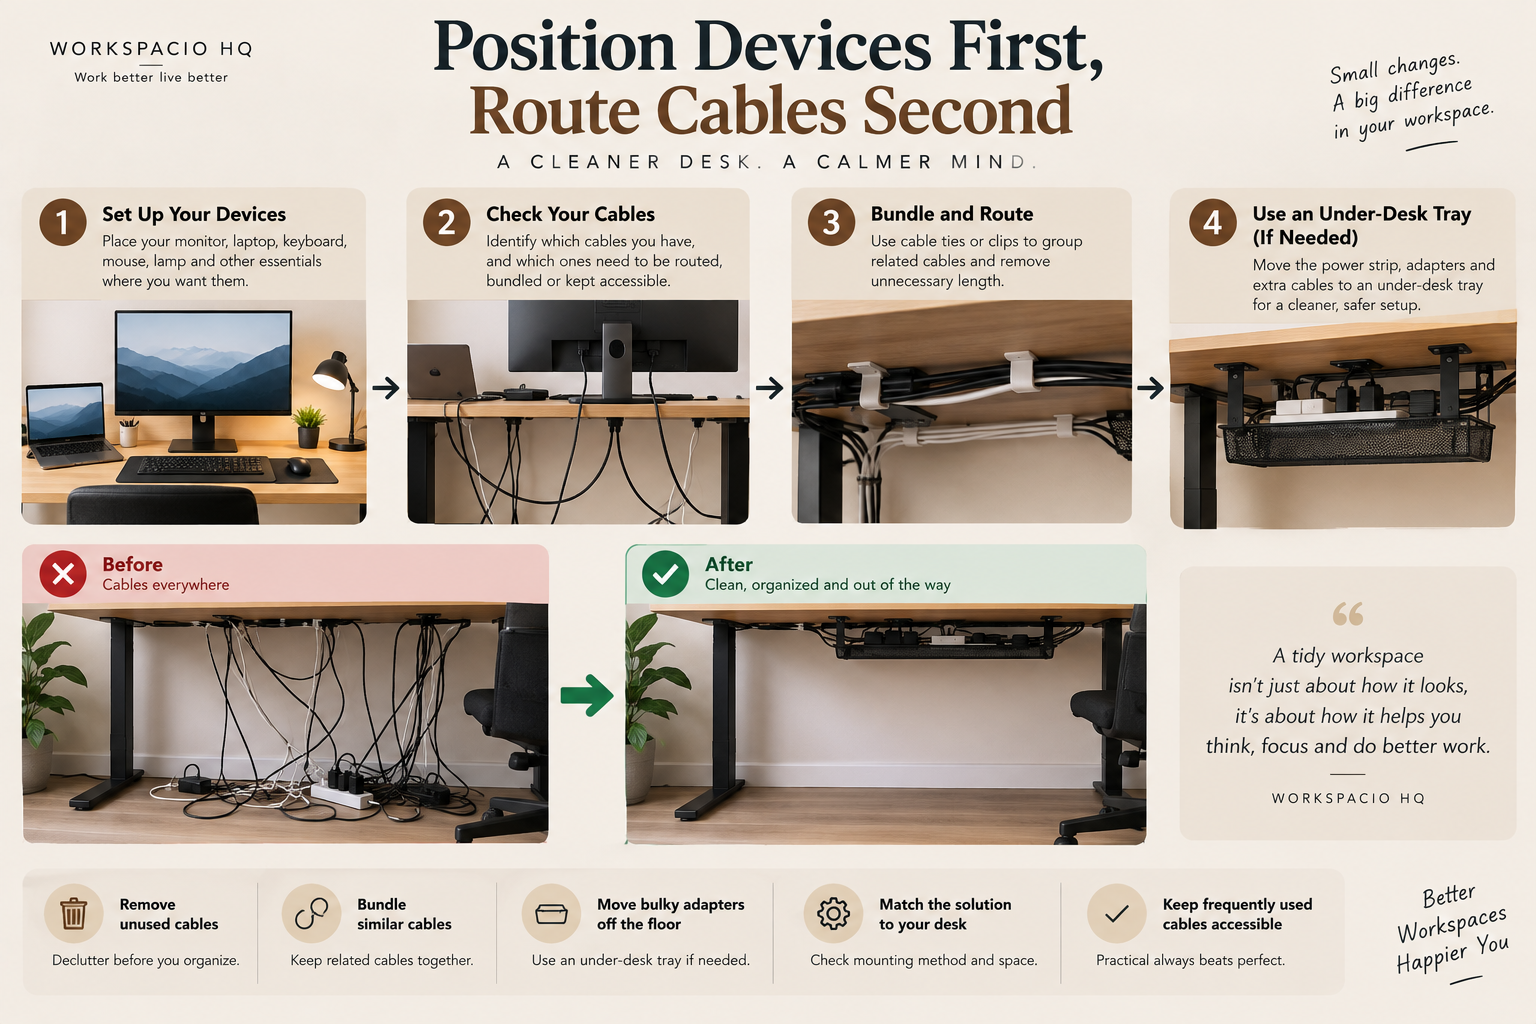
7. Organize Cables After Your Devices Have a Home
Cable management is one of the most visually satisfying parts of desk organization—which makes it tempting to do first.
Don’t.
First decide where your permanent devices will live.
Position your monitor, laptop or dock, keyboard, lamp, speakers, chargers, and other regularly connected equipment.
Then examine the cables that setup actually creates.
You’ll usually find different types of cable problems:
- Excess cable length that needs routing or bundling
- Charging cables that need to remain accessible
- Permanent device cables that rarely move
- Power strips and bulky adapters taking up surface or floor space
Trying to hide everything before deciding where your devices belong can mean redoing the entire cable setup later.
Start Without Buying Anything
Remove cables you no longer use.
Separate permanent connections from cables you frequently disconnect.
Bundle excess length where appropriate.
Route related cables together rather than letting each one take its own path across the desk.
For a simple setup, reusable ties or clips you already own may be enough.
When an Under-Desk Cable Tray Helps
If the bigger problem is a power strip, adapters, and multiple cables sitting on the floor or hanging underneath the desk, an under-desk tray can move that equipment away from the work surface.
The VIVO 17-Inch Under Desk Cable Management Tray (DESK-AC06-1C) is one product option for this use case.
The key detail isn’t just the tray itself—it’s compatibility.
This particular style requires mounting underneath the desk, so if you don’t want to put mounting holes into your desk, a compatible clamp-on solution may be a better fit.
Before buying any cable tray, check your desk material, available mounting area, tray dimensions, and installation method.
Don’t ask only: “Which cable tray looks best?”
Ask: “Which mounting method actually works with my desk?”
8. Use Vertical and Under-Desk Space Carefully
When your desktop starts running out of room, the natural reaction is to search for unused space.
Sometimes that’s exactly the right move.
Papers can sometimes be stored vertically rather than stacked horizontally. Occasional supplies may fit on a nearby shelf. Depending on the workstation, another storage solution may reclaim surface area without pushing essential equipment into awkward positions.
If your entire office is compact, our 15 Smart Small Home Office Ideas to Maximize Your Space guide has more ways to make limited space work harder.
But there’s an important distinction between unused space and space your body needs.
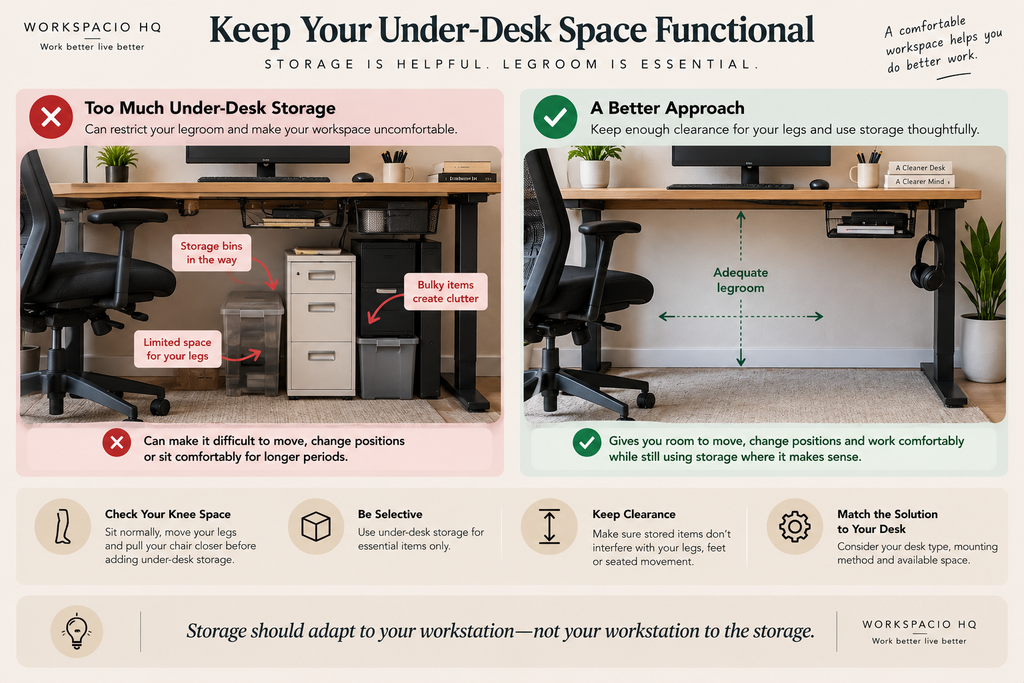
Don’t Fill Every Inch Under the Desk
The area beneath your desk can look like ideal storage territory.
Your legs need it too.
OSHA specifically recommends sufficient clearance underneath a work surface so the user can position their legs and feet and change seated positions. It also advises limiting stored items that restrict that space.
Before adding an under-desk drawer, storage basket, computer mount, or similar accessory, sit at the desk normally.
Check where your knees go.
Move your legs.
Pull your chair closer.
See whether the proposed storage would interfere.
If it does, you’re solving a clutter problem by creating a workstation problem.
Storage should adapt to your workstation—not your workstation to the storage.
Sometimes the most useful thing you can do with empty under-desk space is leave it empty.
9. Create One Charging and Tech Zone
Small electronics create a different type of clutter.
Your phone is charging on one side of the desk. Earbuds are somewhere near the keyboard. A power bank is connected on the other side. An external drive is sitting wherever its cable happens to reach.
Instead of treating every device separately, create one predictable area for small tech.
Depending on your setup, that could be:
- one corner of the desk,
- a nearby shelf,
- an existing drawer with suitable cable access, or
- another dedicated surface beside the desk.
The purpose isn’t to hide every electronic device.
It’s to stop temporary tech from migrating through your main work area.
Frequently connected equipment can stay close to the computer. Less frequently used devices don’t need to occupy your primary work zone.
And before buying a dedicated charging station, test the system with what you already have.
Sometimes assigning existing chargers one location solves the problem without adding another accessory.
10. Buy Organizers Only for Problems You Actually Have
Once you start looking at desk-organization inspiration, buying storage can begin to feel like organization itself.
A pen holder.
A file sorter.
A monitor shelf.
A cable box.
An under-desk drawer.
A charging station.
A desktop organizer.
Each product might be useful in the right setup. But add enough of them and the organizers themselves begin consuming the space you’re trying to reclaim.
Instead, identify the bottleneck first.
If pens, adapters, and sticky notes keep spreading across the surface, small-item storage may help.
If active documents constantly turn into piles, a paper system may help.
If your power strip and adapters are hanging beneath the desk, a cable tray may help.
If none of those things is a problem for you, you don’t need the corresponding product.
Use This 3-Question Test Before Buying
1. What exactly will go inside or on it?
You should be able to name the items.
2. Where exactly will it live?
Measure the available space and check compatibility before ordering.
3. Will it remove a recurring problem—or simply relocate clutter?
That final question matters.
A beautiful organizer filled with things you never use is still taking up space.
The same principle applies when deciding which tools deserve permanent room in your setup. If you’re still building your workspace, our guide to 15 Home Office Essentials for Maximum Productivity can help you evaluate the broader setup—but you don’t need every possible accessory just because it’s labeled a home-office essential.
11. End Your Workday With a Quick Desk Reset
A functional desk will still get messy while you’re using it.
That’s normal.
You’ll open a notebook, connect a charger, bring over a drink, unpack something, use a document, or temporarily move an accessory.
A desk that never changes probably isn’t being used much.
The better test of your organization system is:
How easy is it to restore?
At the end of your workday:
- Return loose items to their assigned homes.
- Put active papers back in their designated place.
- Remove cups, packaging, and temporary items.
- Return chargers and loose cables where they belong.
- Clear the primary work zone for the next session.
There’s no need to turn this into a complicated ritual or promise that it will always take exactly two minutes.
Keep it simple.
More importantly, pay attention when the reset repeatedly becomes difficult.
If you’re constantly leaving one item out because its storage location is inconvenient, move its home closer.
If papers never fit the categories you’ve created, simplify the paper system.
If an organizer is awkward to access, reconsider whether it belongs there.
If the desktop keeps overflowing despite having a place for everything, you may simply be trying to store too much on it.
A good organization system shouldn’t require constant discipline to survive.
When maintaining it becomes unnecessarily difficult, change the system instead of adding more rules.
Your Desk Doesn’t Need to Look Perfect—It Needs to Work
A well-organized home office desk isn’t necessarily empty, minimalist, or Pinterest-perfect.
It’s understandable.
The things you use frequently are accessible. Occasional items aren’t consuming prime space. Papers have a defined destination. Small accessories have homes. Cables follow the devices they connect to. Storage doesn’t interfere with the way you sit and work.
And when the desk inevitably gets a little messy during the day, you know where everything goes afterward.
There isn’t one universally correct workstation arrangement. Different people, tasks, and workspaces need different setups.
So don’t organize your desk around somebody else’s photo.
Organize it around your work.
Start Here
You don’t need to reorganize your entire home office today.
Look at your desk and ask:
What on this surface doesn’t actually need to live here?
Remove those items first.
Then organize what’s left according to how often you really use it.
Start with that one decision today. Once unnecessary items are gone, the rest of your desk becomes much easier to organize around the way you actually work.
1 thought on “How to Organize a Cluttered Home Office Desk: 11 Practical Ideas”